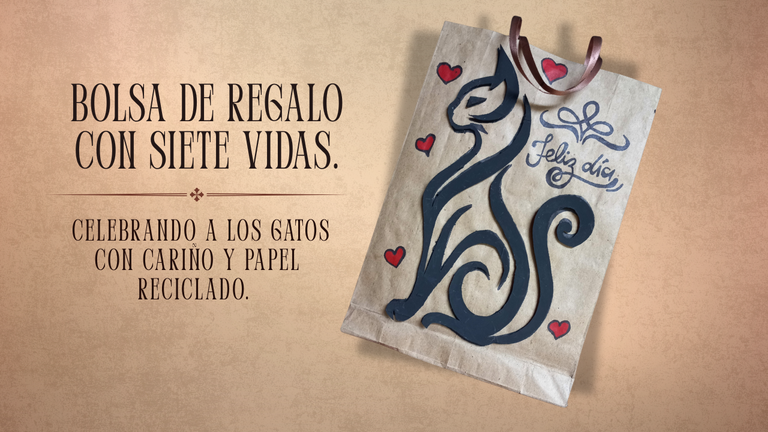
(ESP-ENG) Bolsa de regalo . Celebrando a los gatos con cariño y papel reciclado. / Gift bag. Celebrating cats with love and recycled paper.
Hola, colonias digitales que conforman el universo de Hive. Reciban un fuerte abrazo.
Hello, digital colonies that make up the Hive universe. Receive a big hug.
I hope you're doing well from the other side of the screen.
Hola, comunidad creativa de HIVE. Hoy estoy súper contenta de compartir mi primera participación en esta hermosa iniciativa de Creative Papercraft, una comunidad que recién descubro gracias al reposteo de la amiga @equipodelta, así que un agradecimiento enorme para ella. Apenas leí la propuesta, supe que quería ser parte de este espacio que celebra el arte en papel con propósito, imaginación y ternura.
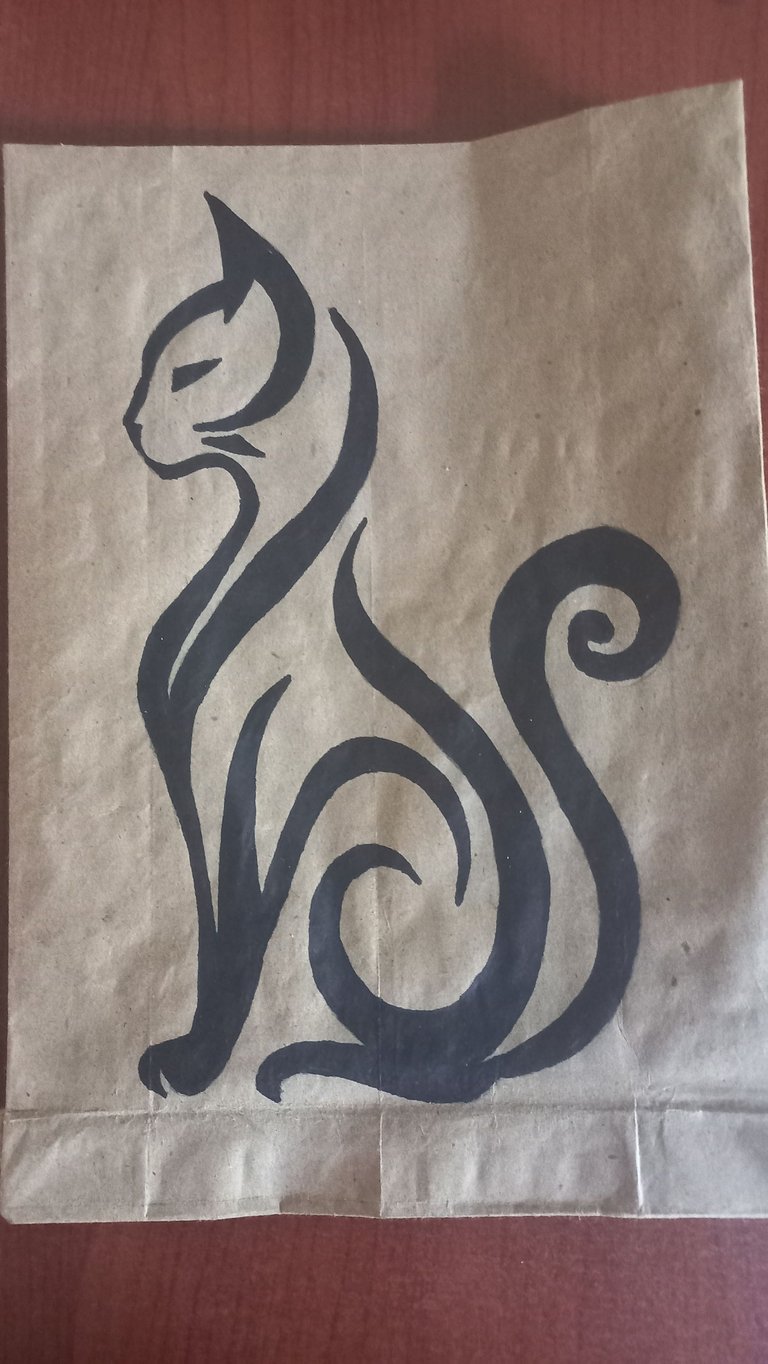
Y como dice la iniciativa, agosto es el mes de los gatitos, y qué mejor manera de honrar a estos adorables compañeros que dándole vida a un proyecto hecho con nuestras propias manos. Es por eso que, para mi participación he decidido crear una bolsita de regalo con la dulce figura de un gatito en relieve. Lo mejor de todo es que, fiel a mi estilo, la haré con papel y cartón reciclados, demostrando que la creatividad y el cariño no tienen que ir de la mano con el gasto.
Sin más preámbulo es hora de darle vida a ese gatito de papel. Acompáñenme en el paso a paso.
Hello, creative community at HIVE. Today, I am thrilled to share my first contribution to this wonderful initiative by Creative Papercraft, a community I recently discovered thanks to a repost by my friend @equipodelta, so a huge thank you to her. As soon as I read the proposal, I knew I wanted to be part of this space that celebrates paper art with purpose, imagination, and tenderness.
And as the initiative says, August is Kitten Month, and what better way to honor these adorable companions than by bringing to life a project made with our own hands. That's why, for my contribution, I've decided to create a gift bag with a sweet embossed kitten design. Best of all, true to my style, I will make it with recycled paper and cardboard, proving that creativity and love do not have to go hand in hand with expense.
Without further ado, it's time to bring that paper kitten to life. Follow along with me step by step.
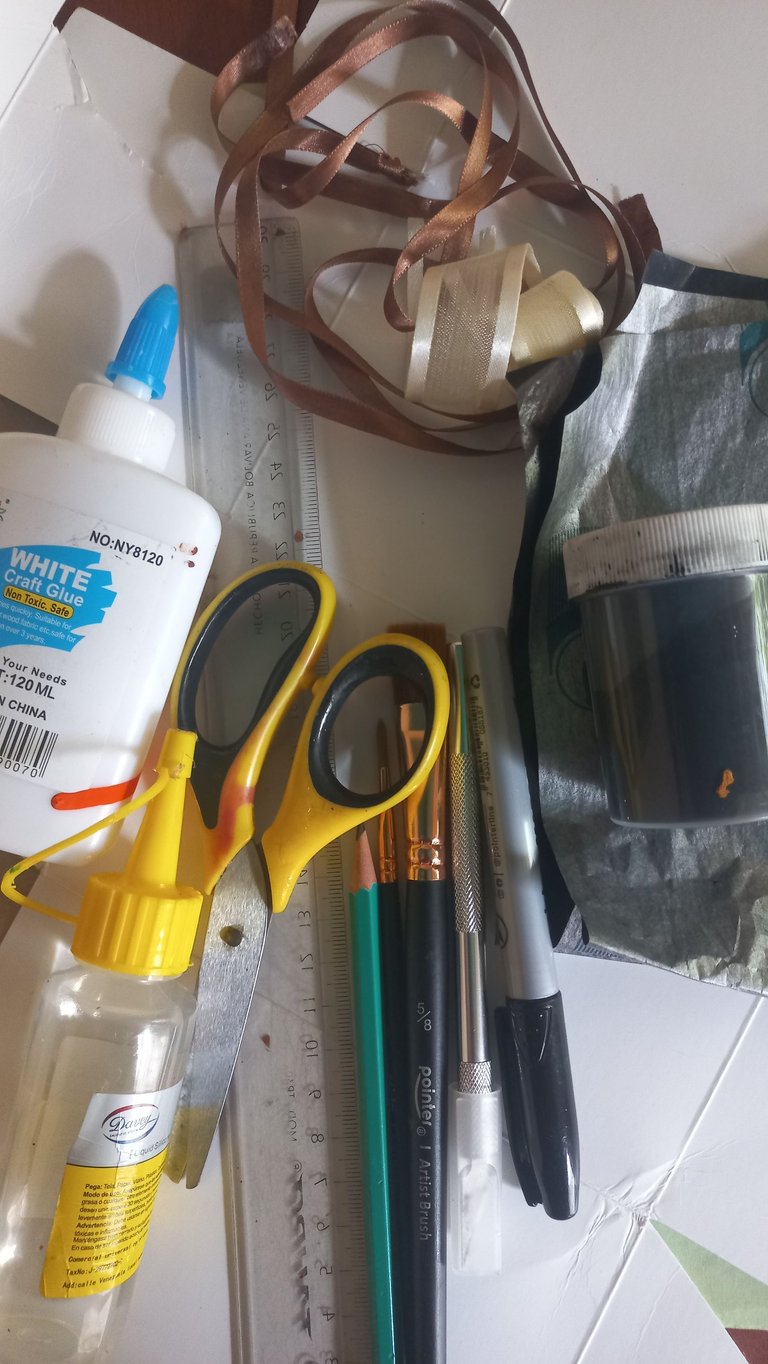
Materiales:
1. Sabre grande de papel reciclado.
2. Tijera.
3. Pintura acrílica negra.
4. Pinceles.
5. Regla.
6. Cartón flexible (el de caja de cereal o de medicamentos).
7. Silicon líquido.
8. Pega escolar.
9. Cúter.
10. Marcadores: negro y rojo.
11. Lápiz.
12. Papel de calcar.
13. Cinta decorativa.
14. Diseño.
Materials:
1. Large recycled paper sword.
2. Scissors.
3. Black acrylic paint.
4. Brushes.
5. Rule.
6. Flexible cardboard (the kind used for cereal boxes or medicine boxes).
7. Liquid silicon.
8. School glue.
9. Cutter.
10. Markers: black and red.
11. Pencil.
12. Tracing paper.
13. Decorative ribbon.
14. Design.
 |  |
|---|
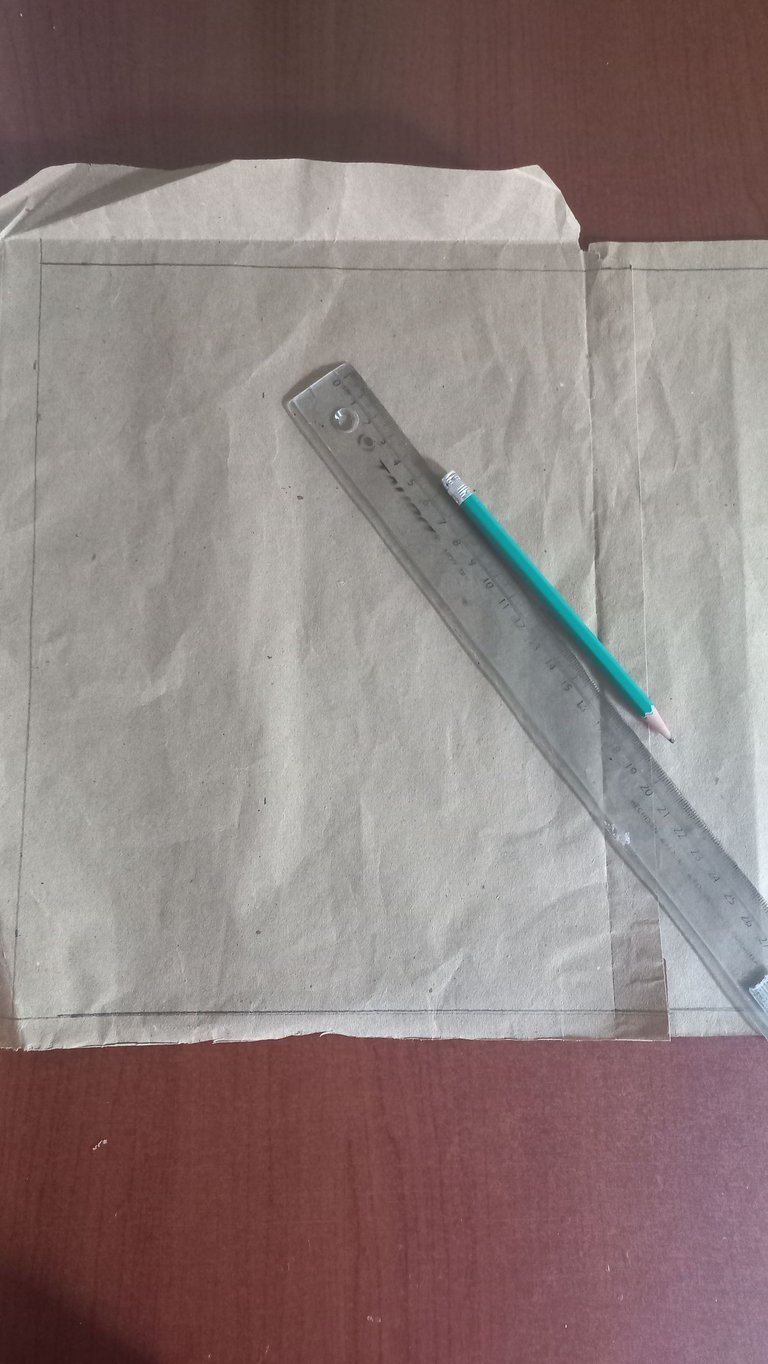
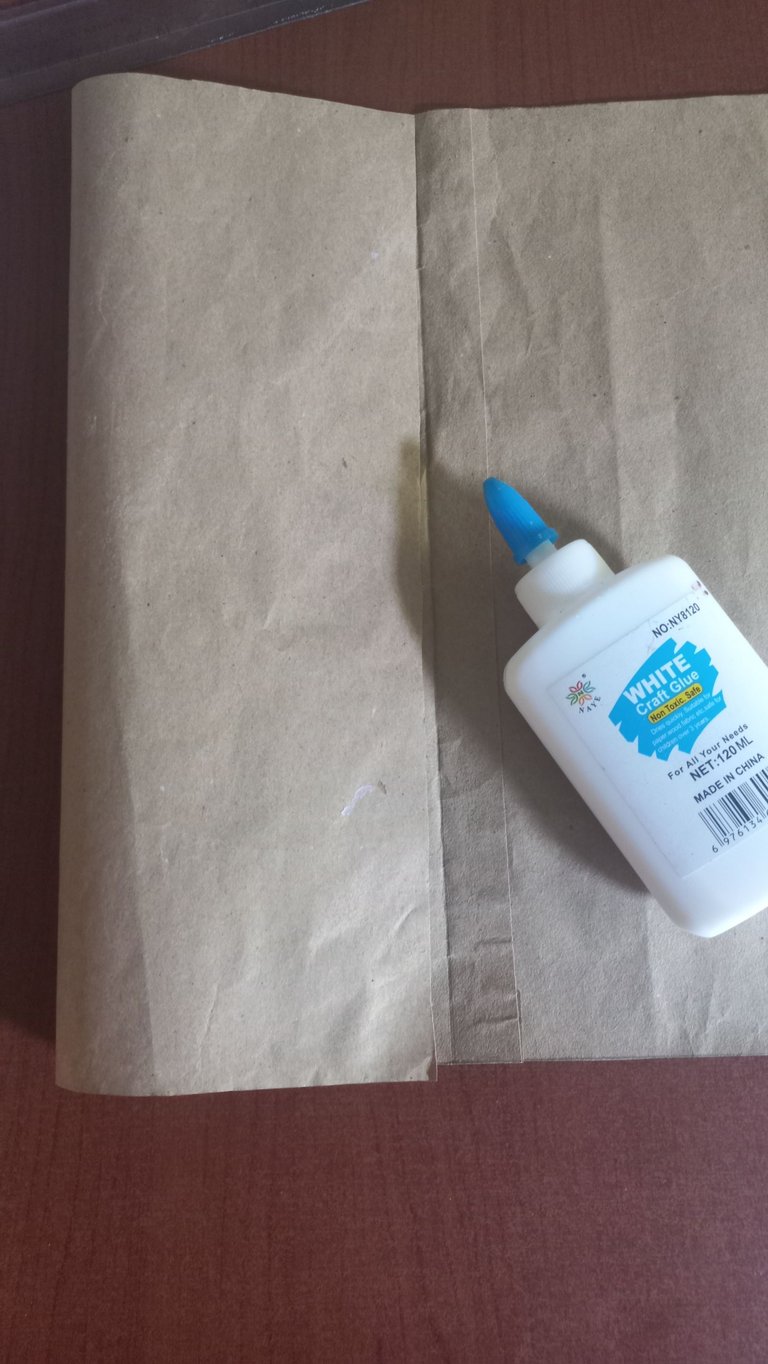
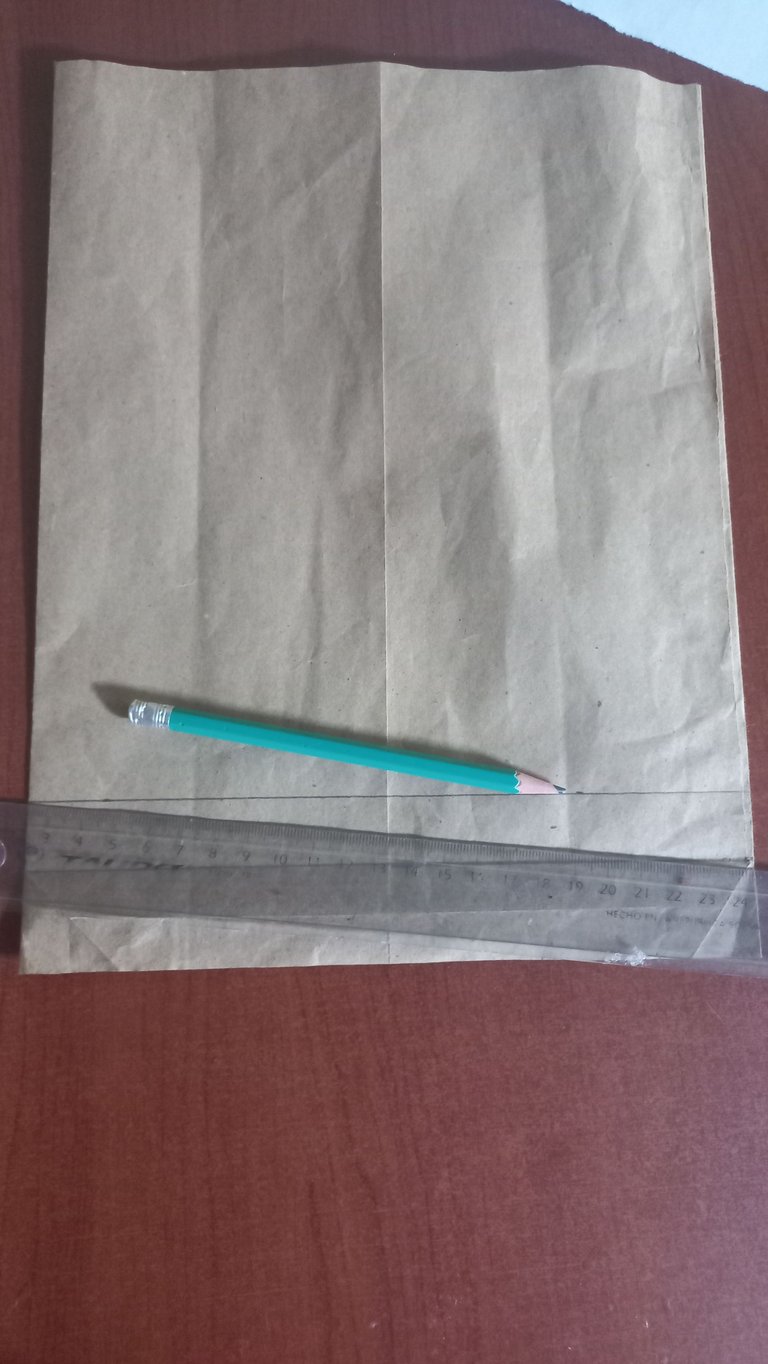
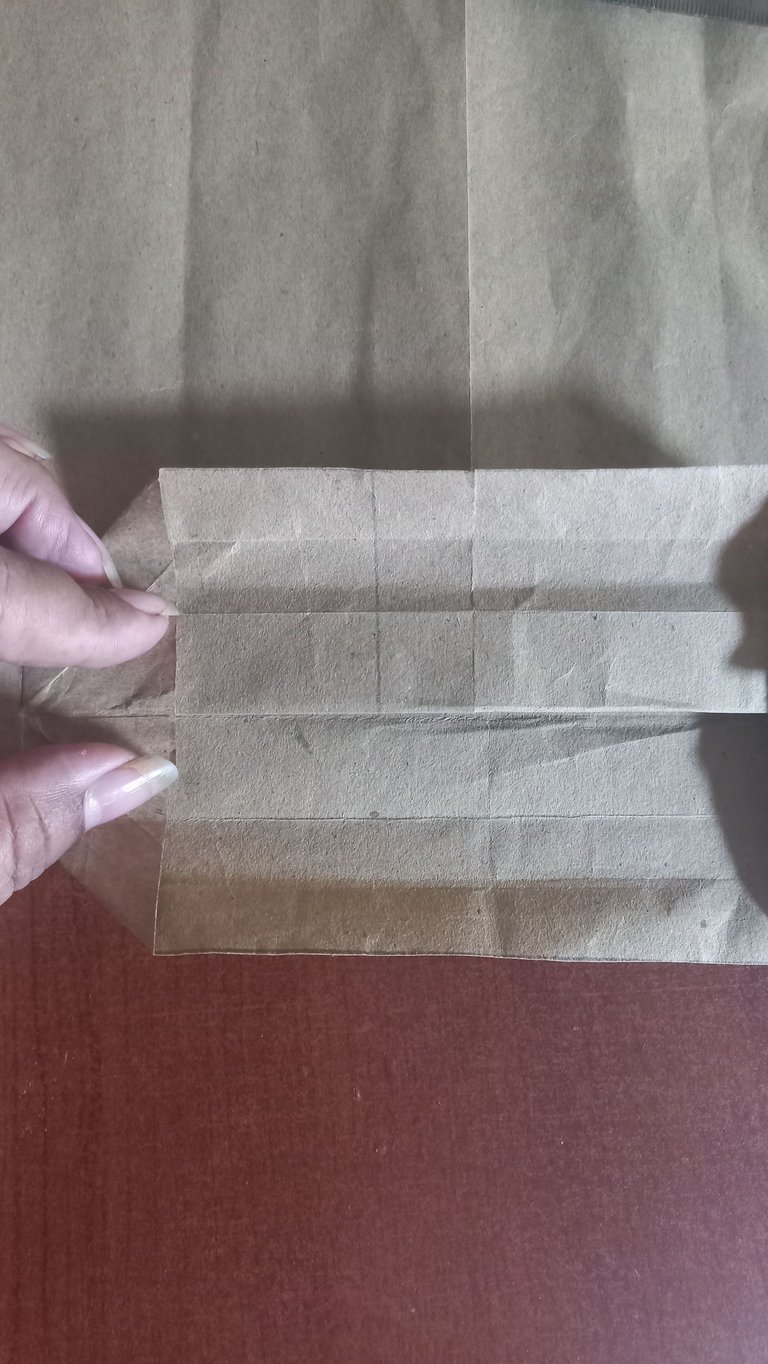
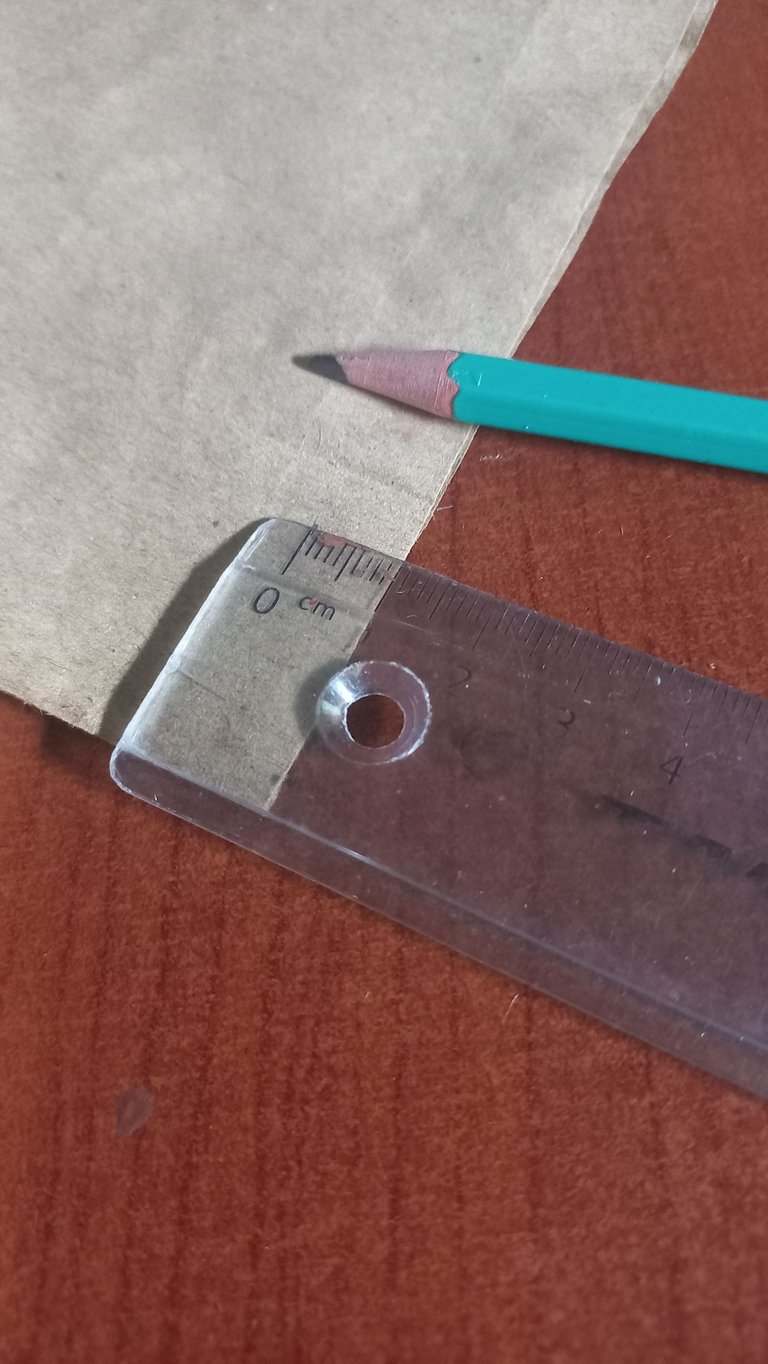
Para comenzar con la bolsita, uso el sobre de papel como base. Primero, trazo un rectángulo de 29 cm de alto por 44 cm de ancho. Ubico el centro del rectángulo y doblo ambos extremos hacia él centro, formando así la estructura de la bolsa. Luego los uno con pega escolar. Ahora, en lo que será la parte inferior de la bolsita, marco una línea a 5 cm del borde y doblo esa sección hacia arriba. Este pliegue es la base que le da estabilidad.
To start with the bag, I use the paper envelope as a base. First, I draw a rectangle measuring 29 cm high by 44 cm wide. I locate the center of the rectangle and fold both ends toward the center, thus forming the structure of the bag. Then I join them with school glue. Now, on what will be the bottom of the bag, I mark a line 5 cm from the edge and fold that section upward. This fold is the base that gives it stability.
 |  |
|---|
 |  |
|---|
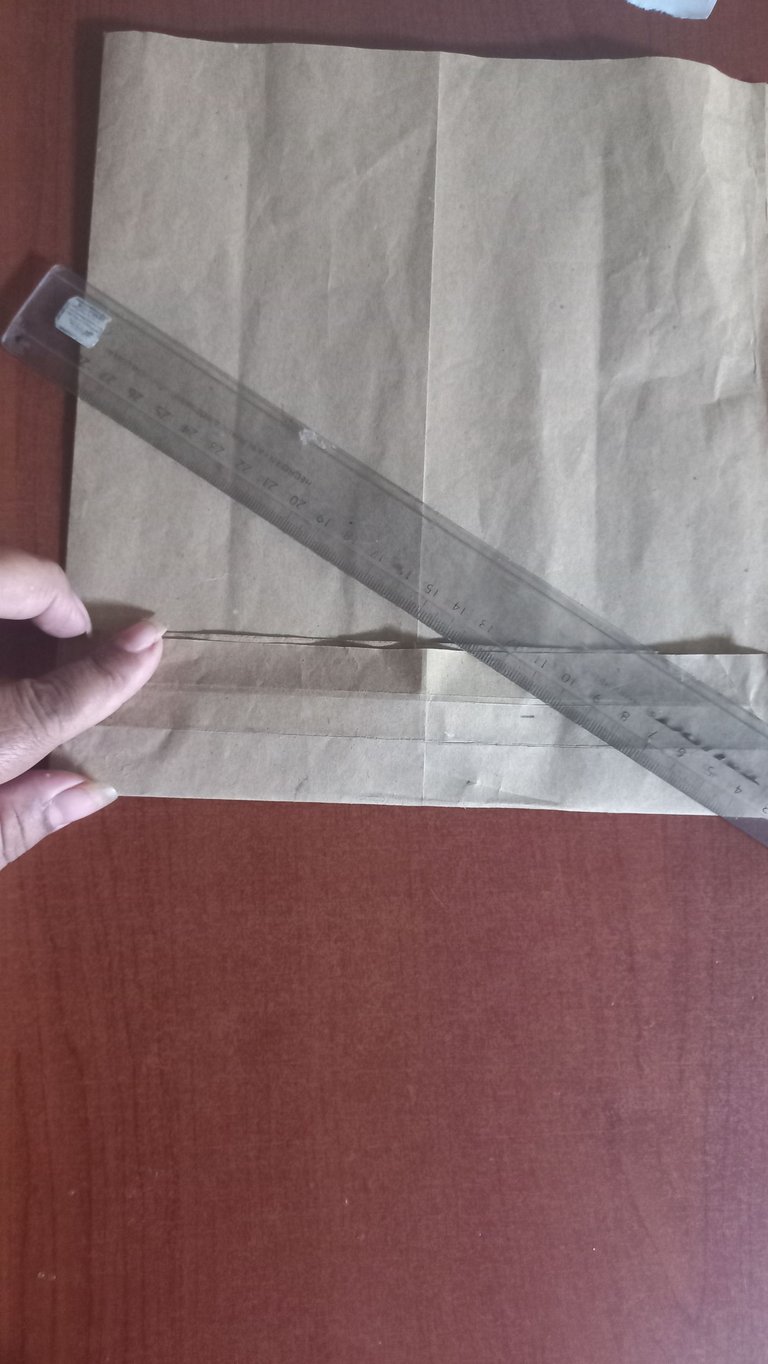
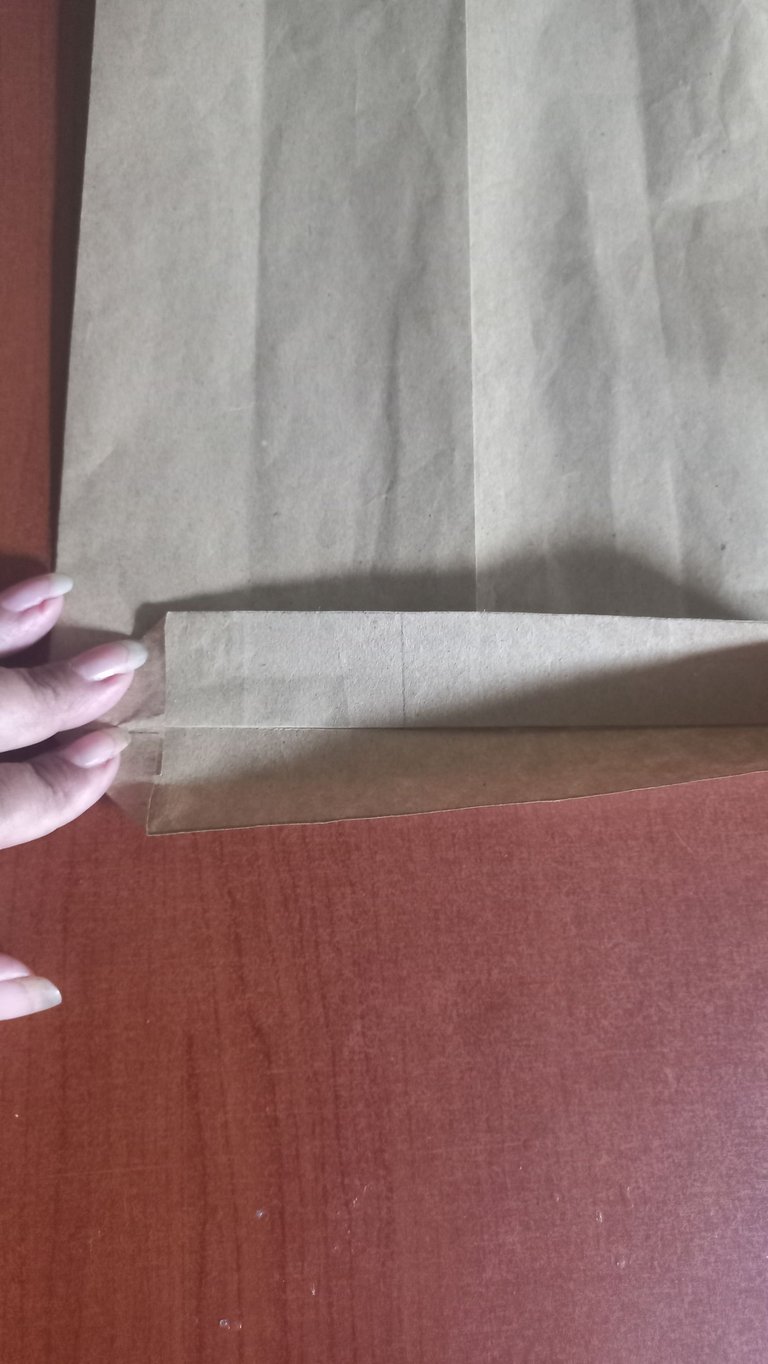
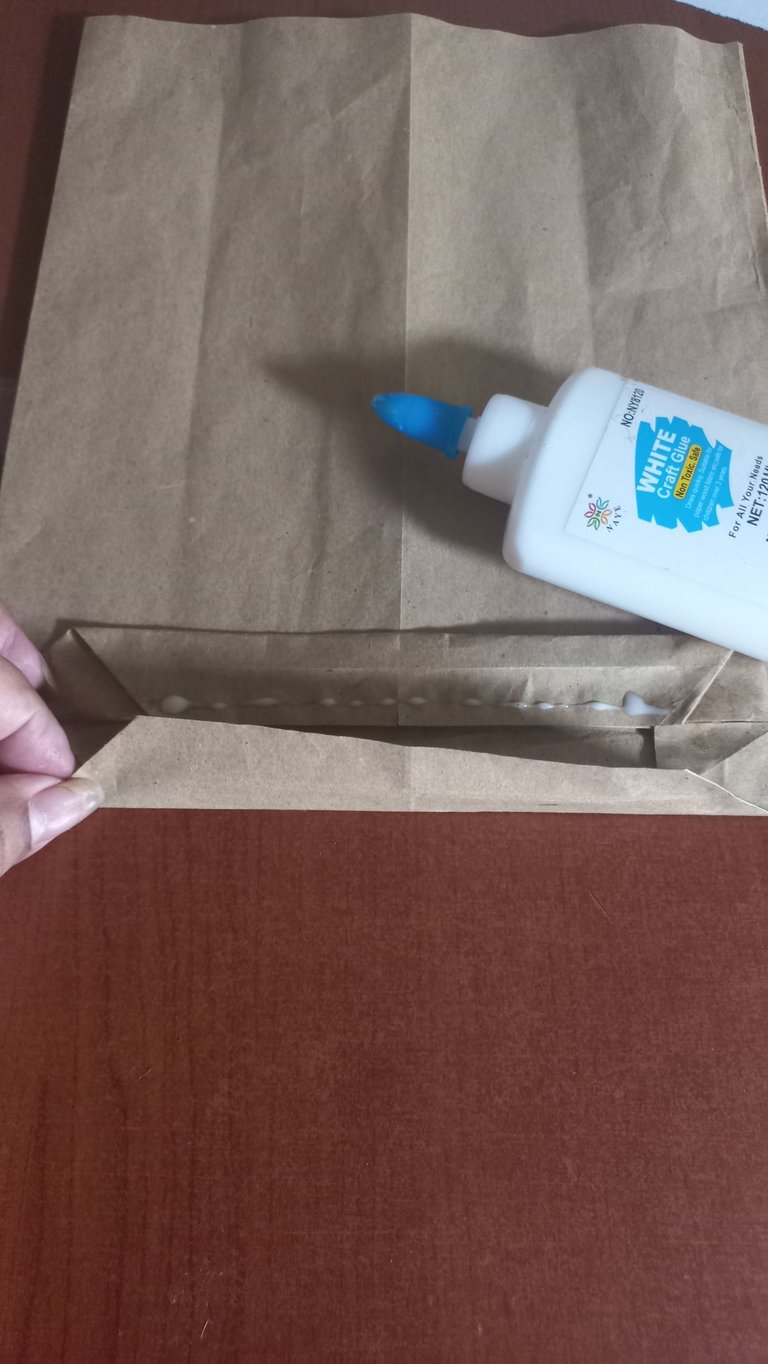
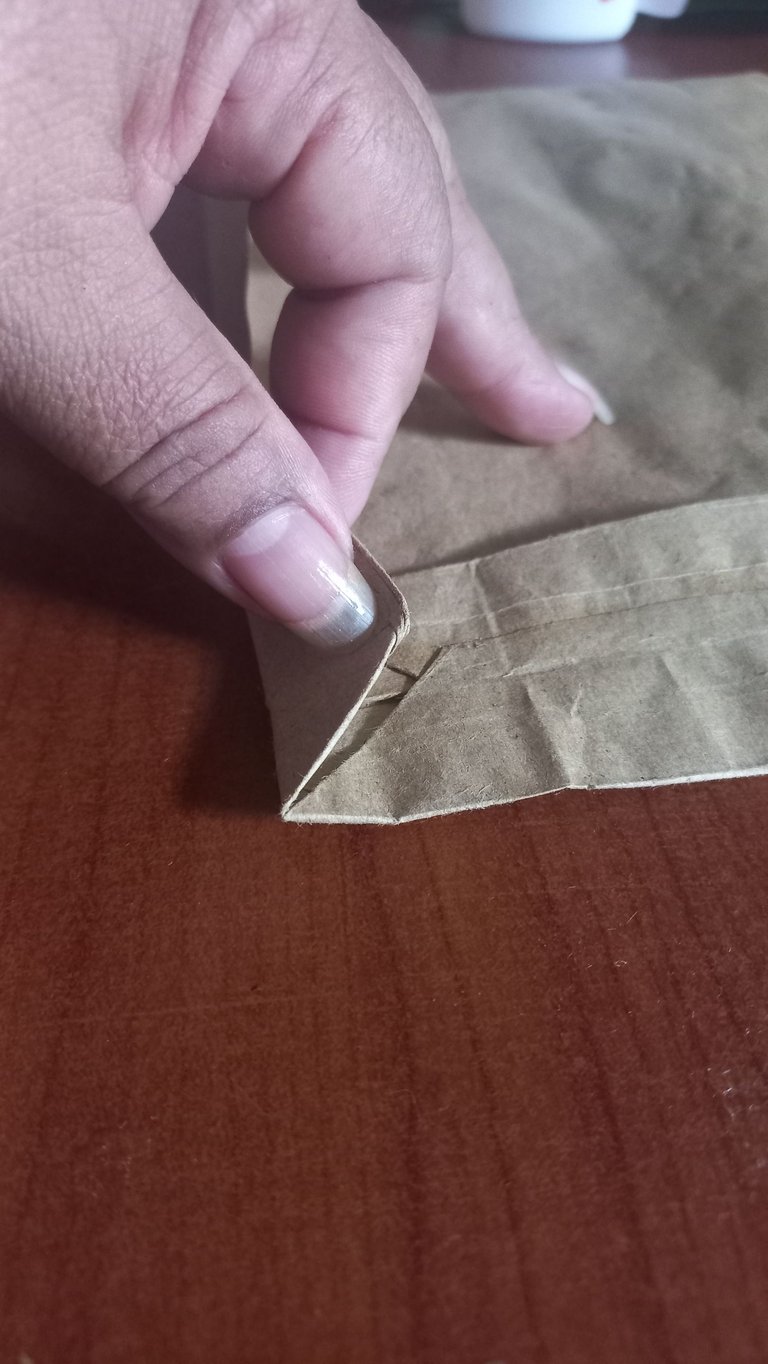
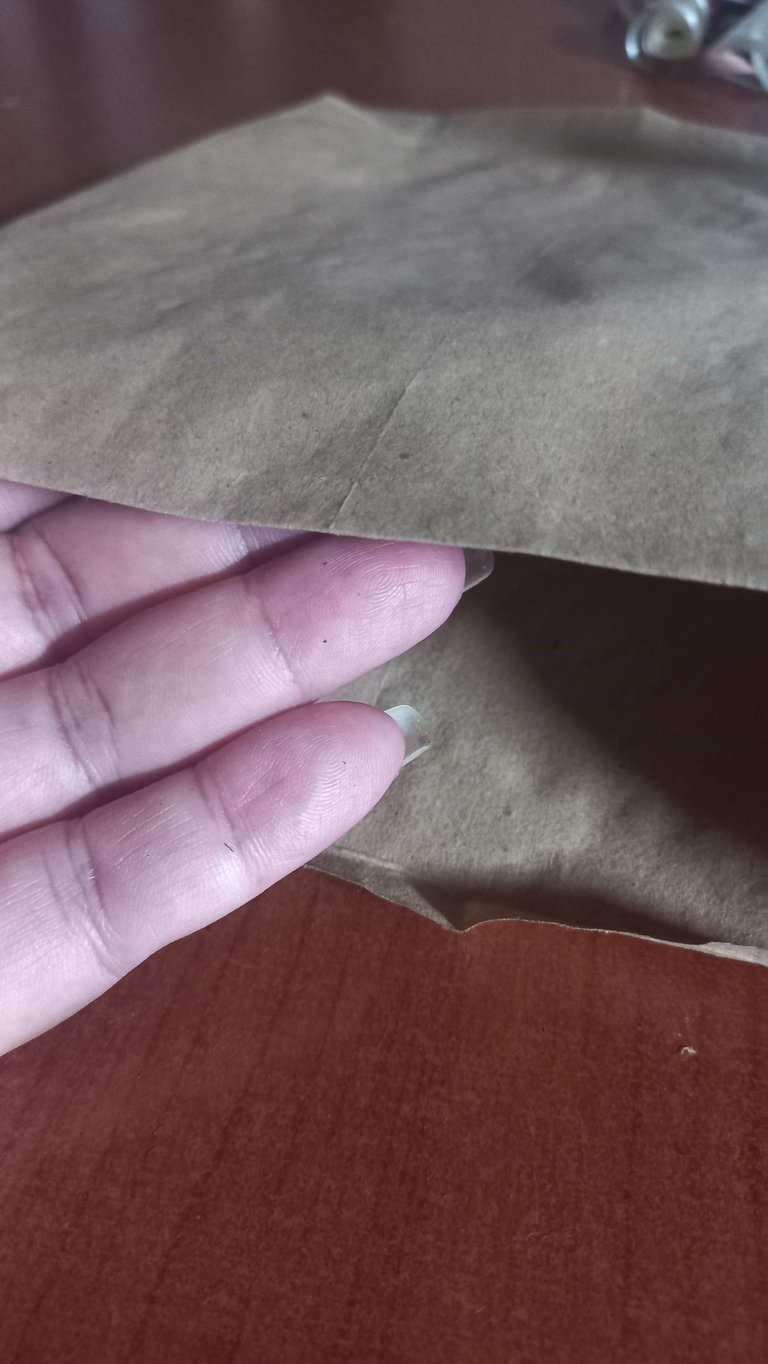
En este paso, abro la sección que doble de 5 cm y, en cada extremo, le doy forma de triángulo, como si estuviera formando unas esquinas. Doblo cada lado hacia la abertura central, creando una especie de solapa, y las pego. Y para finalizar esta parte, doblo los extremos laterales hacia adentro y, con la ayuda de los dedos, marco bien esos pliegues. Ya solo queda abrirla con cuidado y volver a definir los pliegues con los dedos. Y listo ya la base está formada.
In this step, I open the 5 cm fold and shape each end into a triangle, as if I were forming corners. I fold each side toward the center opening, creating a sort of flap, and glue them down. To finish this part, I fold the side ends inward and, with the help of my fingers, mark those folds well. All that remains is to open it carefully and redefine the folds with your fingers. And that's it, the base is now formed.
 |  |  |
|---|
 |  |
|---|
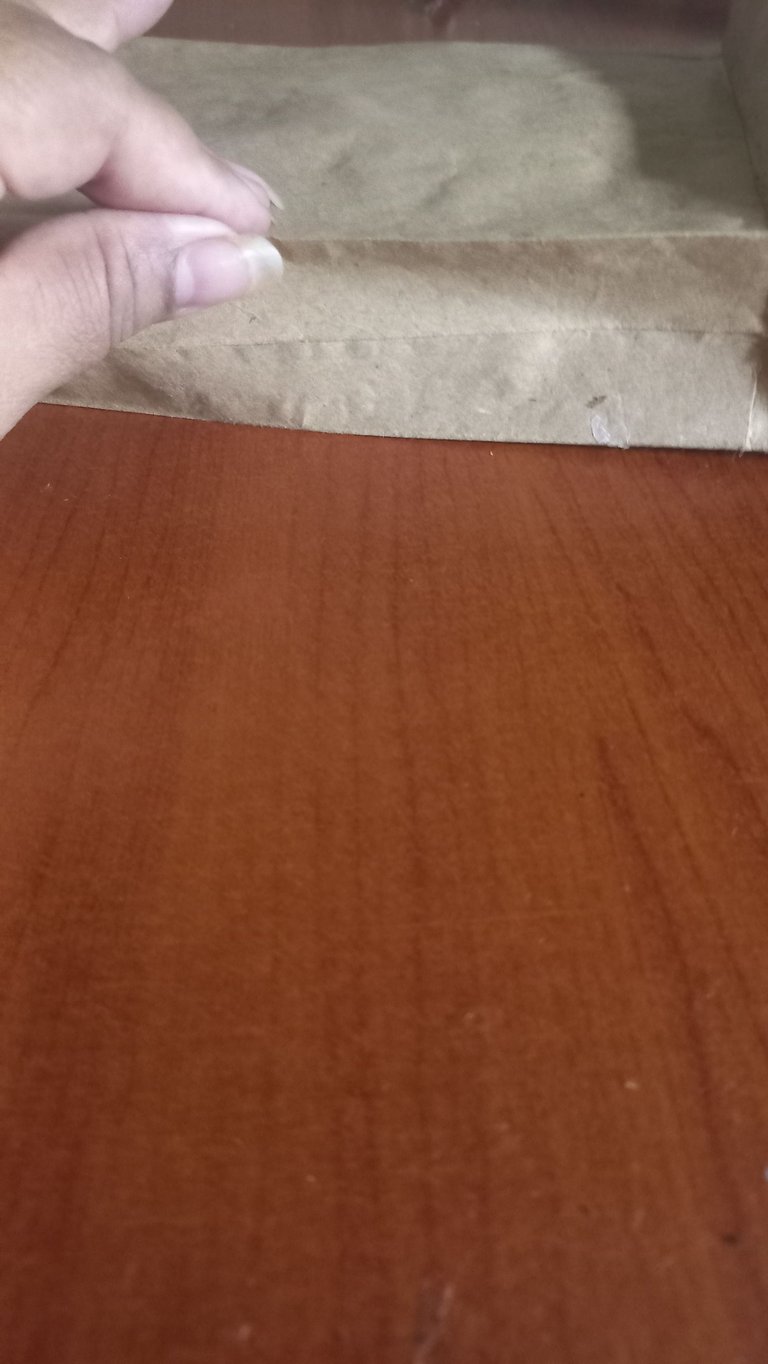
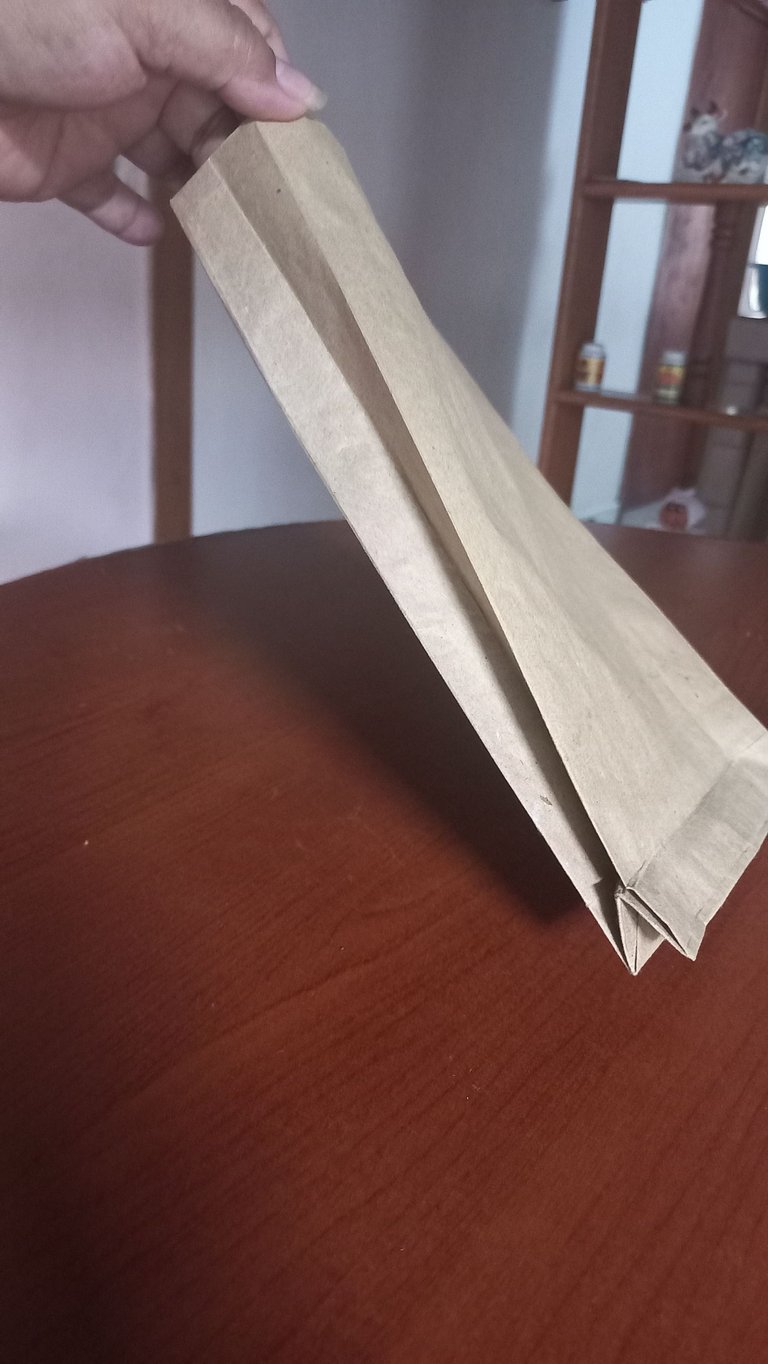
Para darle un cierre uniforme a la parte superior de la bolsita. Mido 1 cm desde el borde superior y doblo esa porción hacia adentro, como si estuviera haciendo un pequeño dobladillo. Este pliegue no solo ayuda a reforzar esa parte, sino que también le da un acabado limpio.
To give the top of the bag a uniform closure, I measure 1 cm from the top edge and fold that portion inward, as if I were making a small hem. This fold not only helps to reinforce that part, but also gives it a clean finish.
 |  |  |
|---|
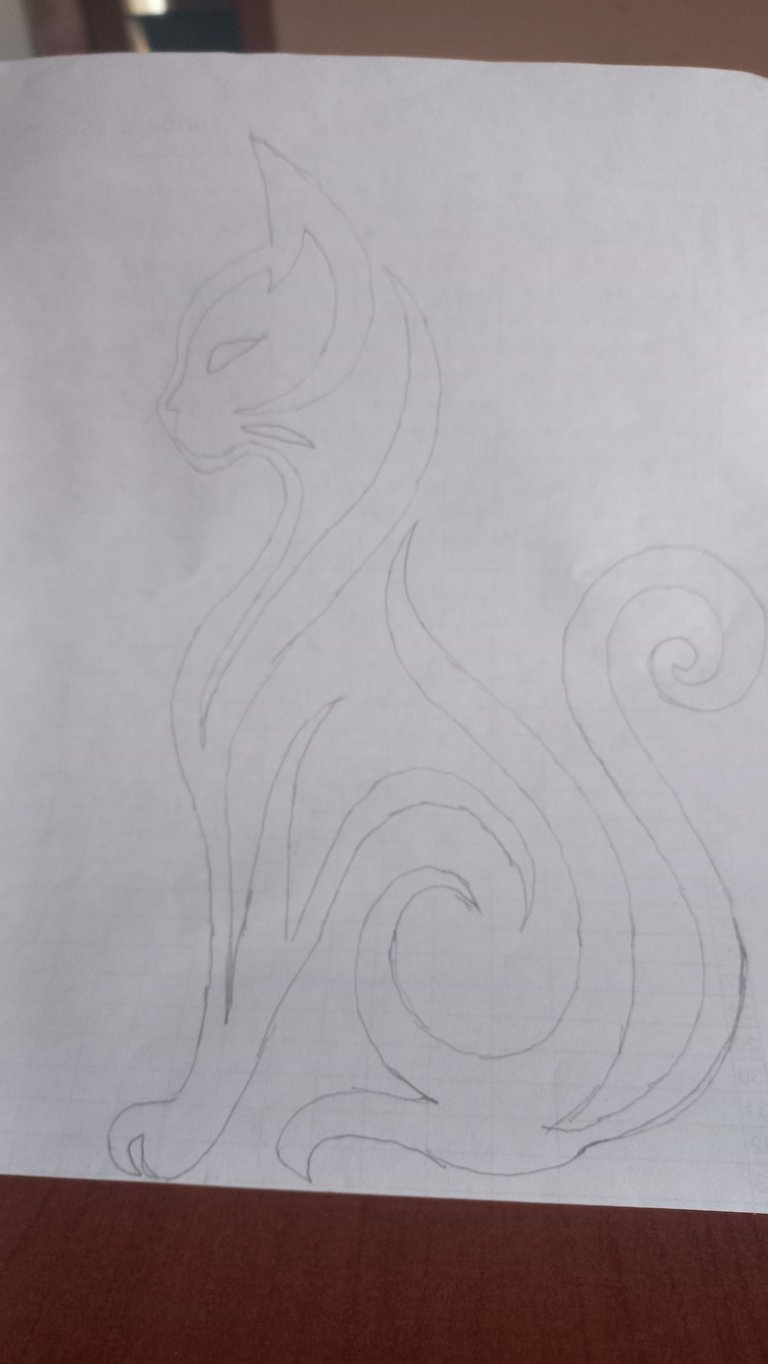
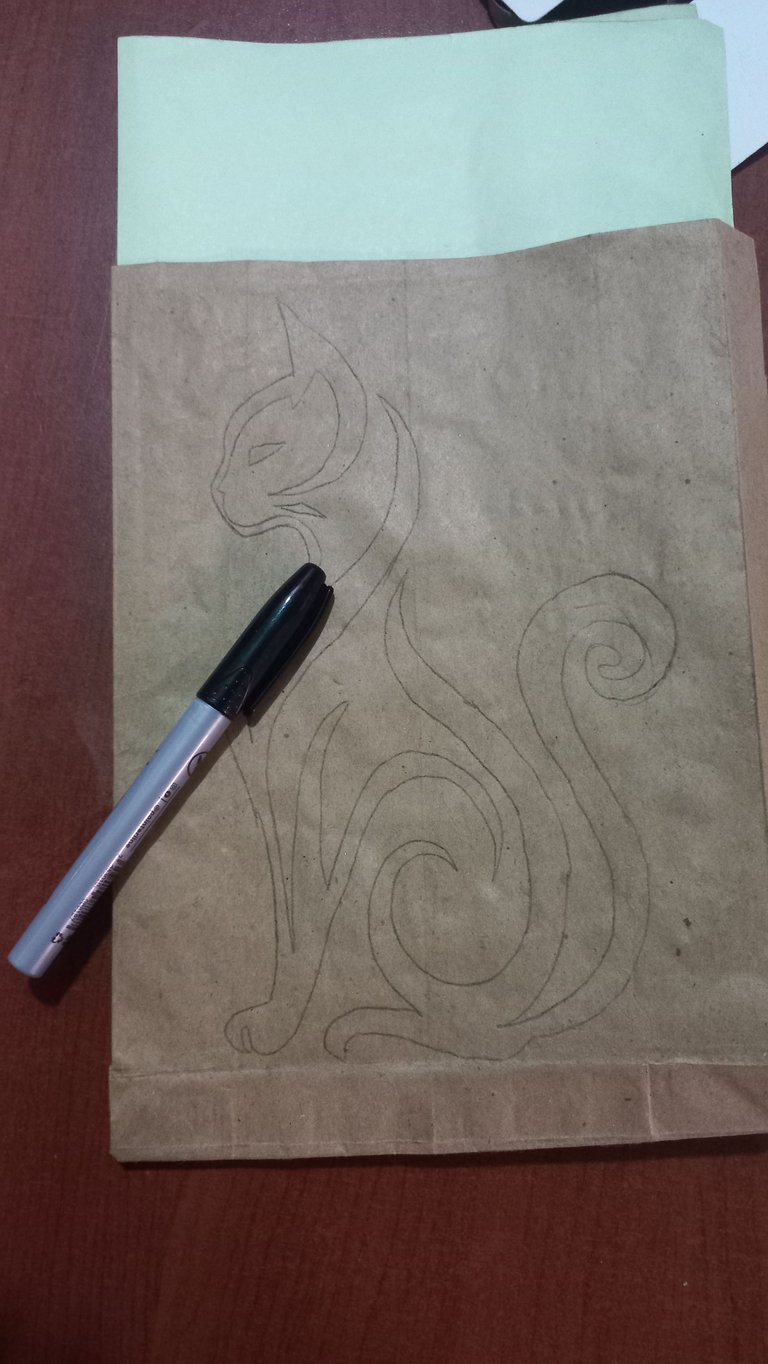
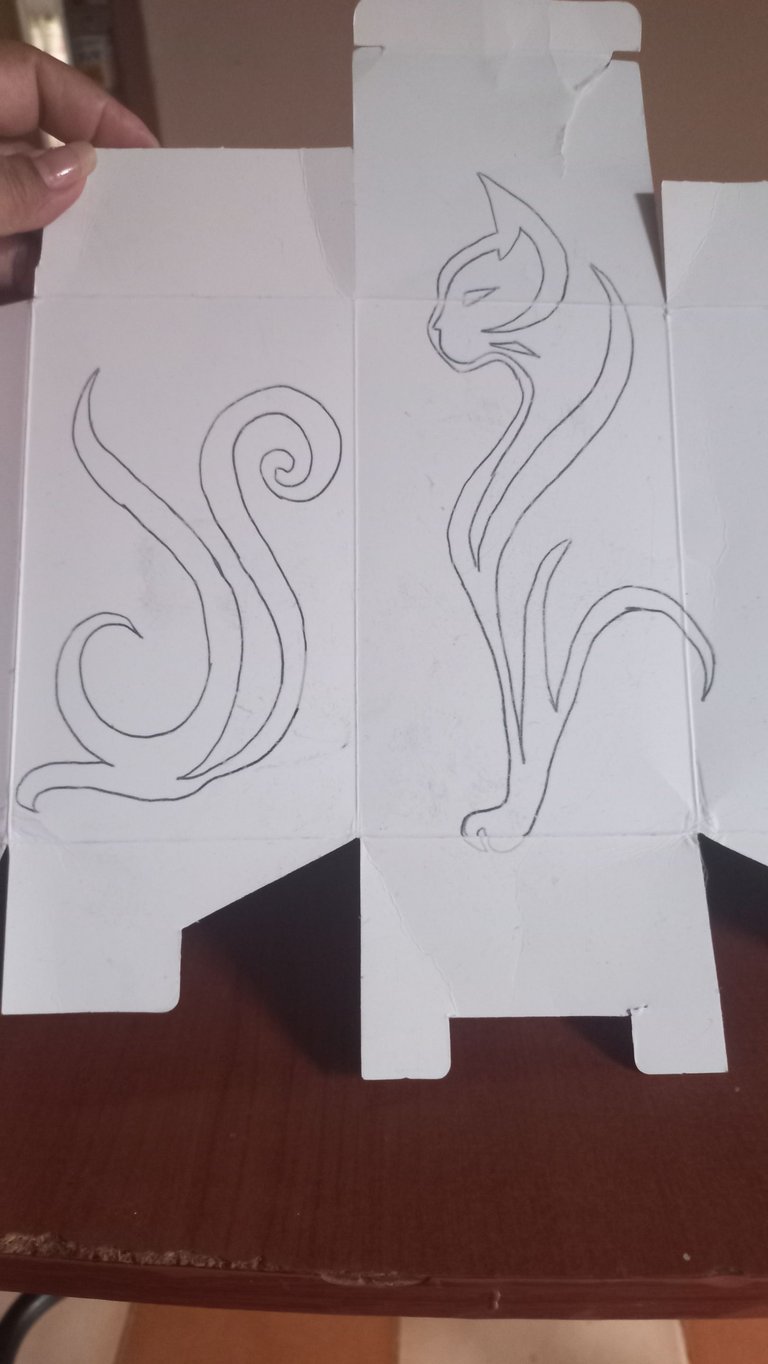
Ahora es el turno de darle personalidad. Primero, transfiero el diseño del gatito a una de las caras de la bolsa. Luego, lo repaso con marcador negro. Un detalle importante: coloco un cartón de respaldo dentro de la bolsa para evitar que la tinta traspase y manche otras partes.
Después, hago el mismo diseño en el cartón flexible. Lo recorto y lo pinto con pintura acrílica negra.
Después, hago el mismo diseño en el cartón flexible. Lo recorto y lo pinto con pintura acrílica negra.
Now it's time to give it some personality. First, I transfer the kitten design onto one side of the bag. Then, I trace it with a black marker. An important detail: I place a piece of cardboard inside the bag to prevent the ink from bleeding through and staining other parts.
Then, I make the same design on the flexible cardboard. I cut it out and paint it with black acrylic paint.
 |  |
|---|
 |  |
|---|
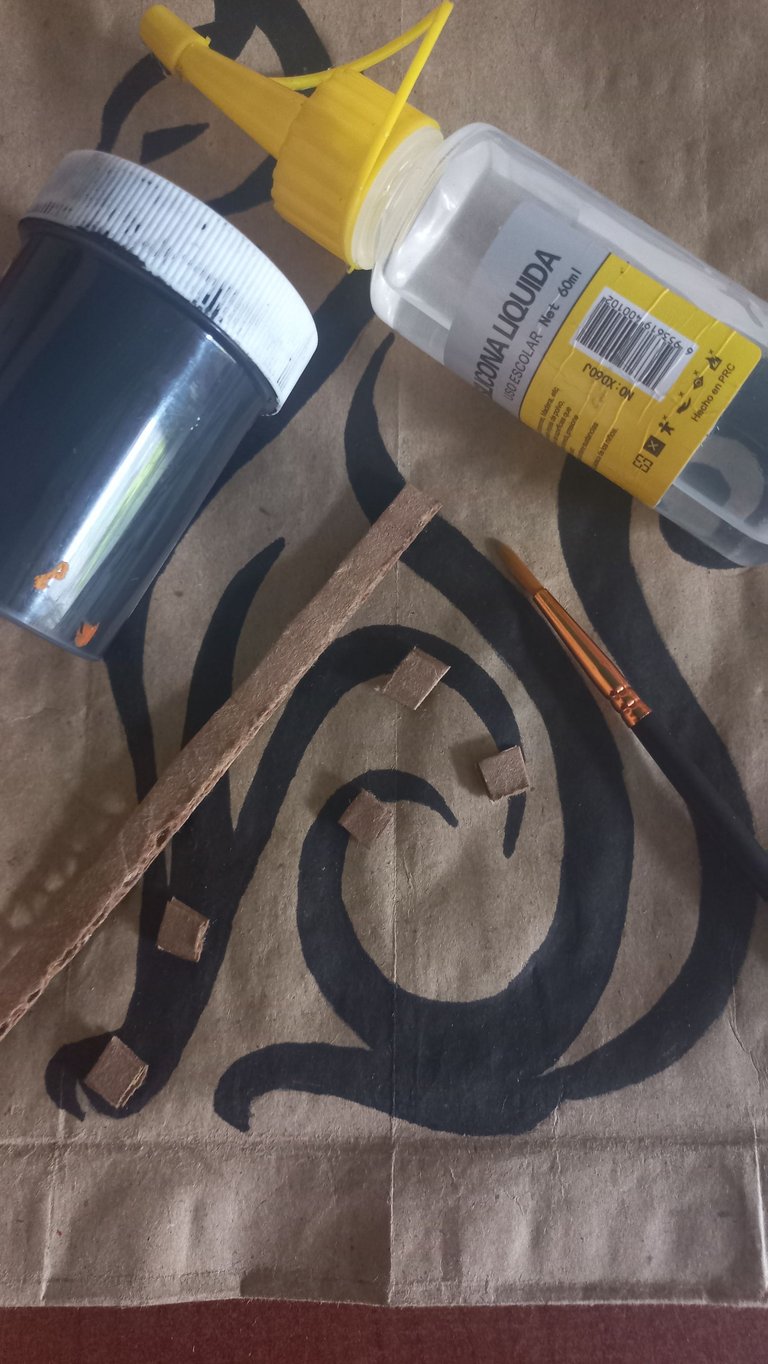
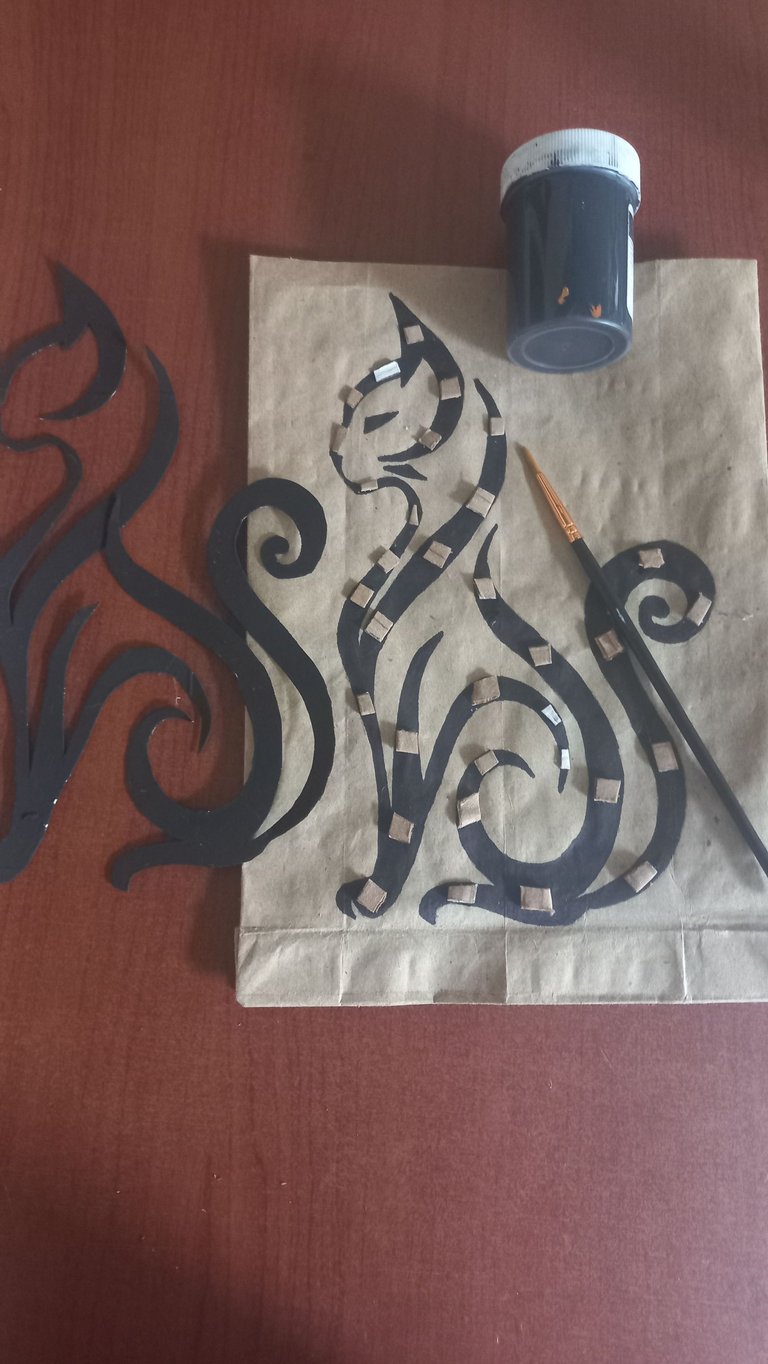
Para lograr el efecto de relieve, corto pequeños trozos de cartón, ajustándolos al grosor de las líneas del diseño que pinté en la bolsa. Los pego cuidadosamente sobre el dibujo y luego los pinto de negro, asegurándome de cubrir bien cada parte. Seca la pieza coloco encima la figura de cartón.
Este paso es opcional. Ya que es un día de celebración, no puede faltar las felicitaciones. Escribo una pequeña frase, decorada a mi gusto, y la relleno con marcador negro para que resalte.
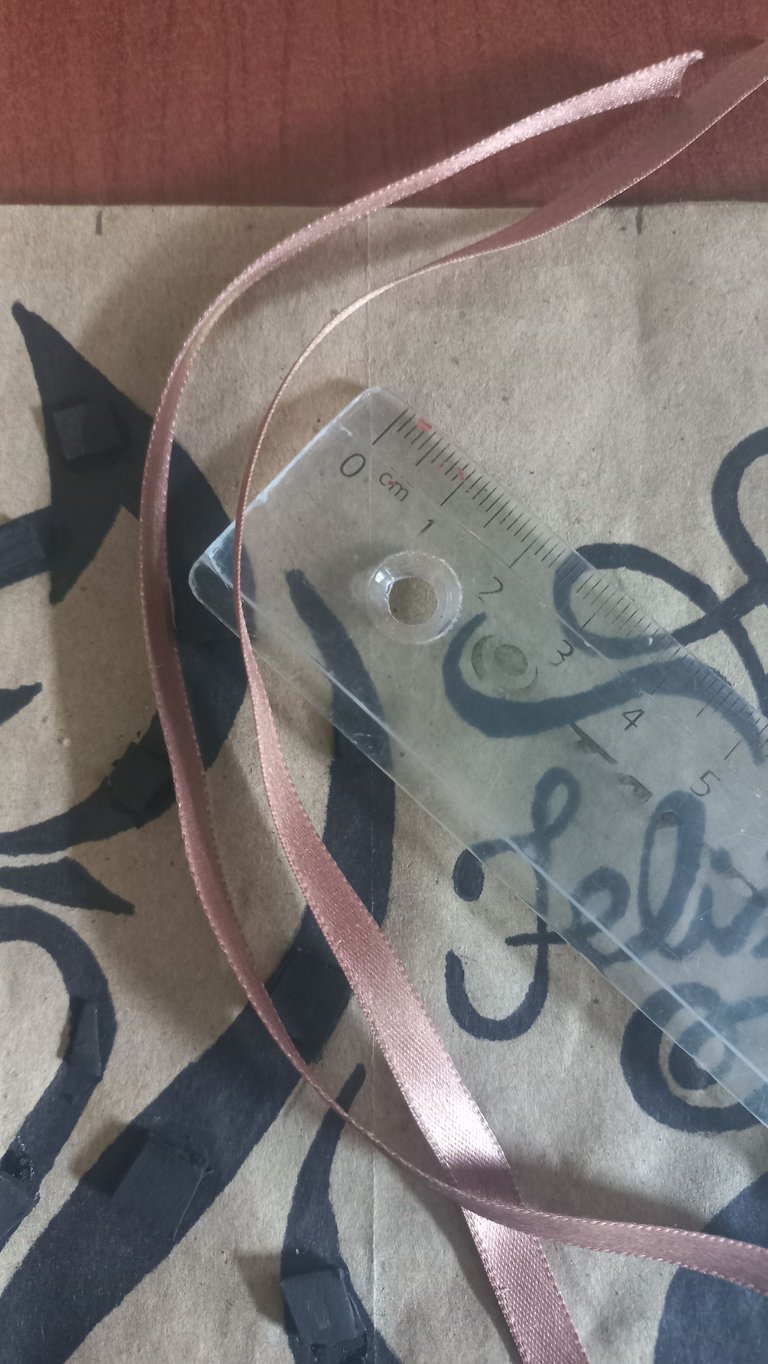
Para terminar, coloco la cinta que servirá como agarradera: Corto dos trozos de cinta de 10 cm de largo por 0,5 cm de ancho. Ubico el centro de la parte superior de la bolsa y mido 3 cm hacia cada lado. Esos son los puntos donde pego los extremos de la cinta, y así, formo las asas.
Este paso es opcional. Ya que es un día de celebración, no puede faltar las felicitaciones. Escribo una pequeña frase, decorada a mi gusto, y la relleno con marcador negro para que resalte.
Para terminar, coloco la cinta que servirá como agarradera: Corto dos trozos de cinta de 10 cm de largo por 0,5 cm de ancho. Ubico el centro de la parte superior de la bolsa y mido 3 cm hacia cada lado. Esos son los puntos donde pego los extremos de la cinta, y así, formo las asas.
To achieve the relief effect, I cut small pieces of cardboard, adjusting them to the thickness of the lines of the design I painted on the bag. I carefully glue them onto the drawing and then paint them black, making sure to cover each part well. Once the piece is dry, I place the cardboard figure on top.
This step is optional. Since it's a day of celebration, congratulations are a must. I write a short phrase, decorate it to my liking, and fill it in with black marker to make it stand out.
Finally, I attach the ribbon that will serve as handles: I cut two pieces of ribbon 10 cm long and 0.5 cm wide. I locate the center of the top of the bag and measure 3 cm to each side. Those are the points where I glue the ends of the ribbon, thus forming the handles.
 |  |
|---|
 |  |
|---|
Finalmente, la bolsita está lista. Para darle un toque aún más especial, le dibujo unos pequeños corazones que celebran, a nuestros adorables gatitos.
Antes de despedirme, quiero aprovechar la oportunidad para dar la bienvenida a la comunidad Creative Papercraft. Me agradará ver el talento que se reunirá aquí. Espero que esta iniciativa sea la primera de muchas y que todos nos animemos a compartir nuestras creaciones.
Gracias por llegar hasta aquí. Saludos.
Finally, the bag is ready. To give it an even more special touch, I draw some little hearts on it to celebrate our adorable kittens.
Before I go, I would like to take this opportunity to welcome the Creative Papercraft community. I look forward to seeing the talent that will come together here. I hope this initiative will be the first of many and that we will all be encouraged to share our creations.
Thank you for coming this far. Best regards.
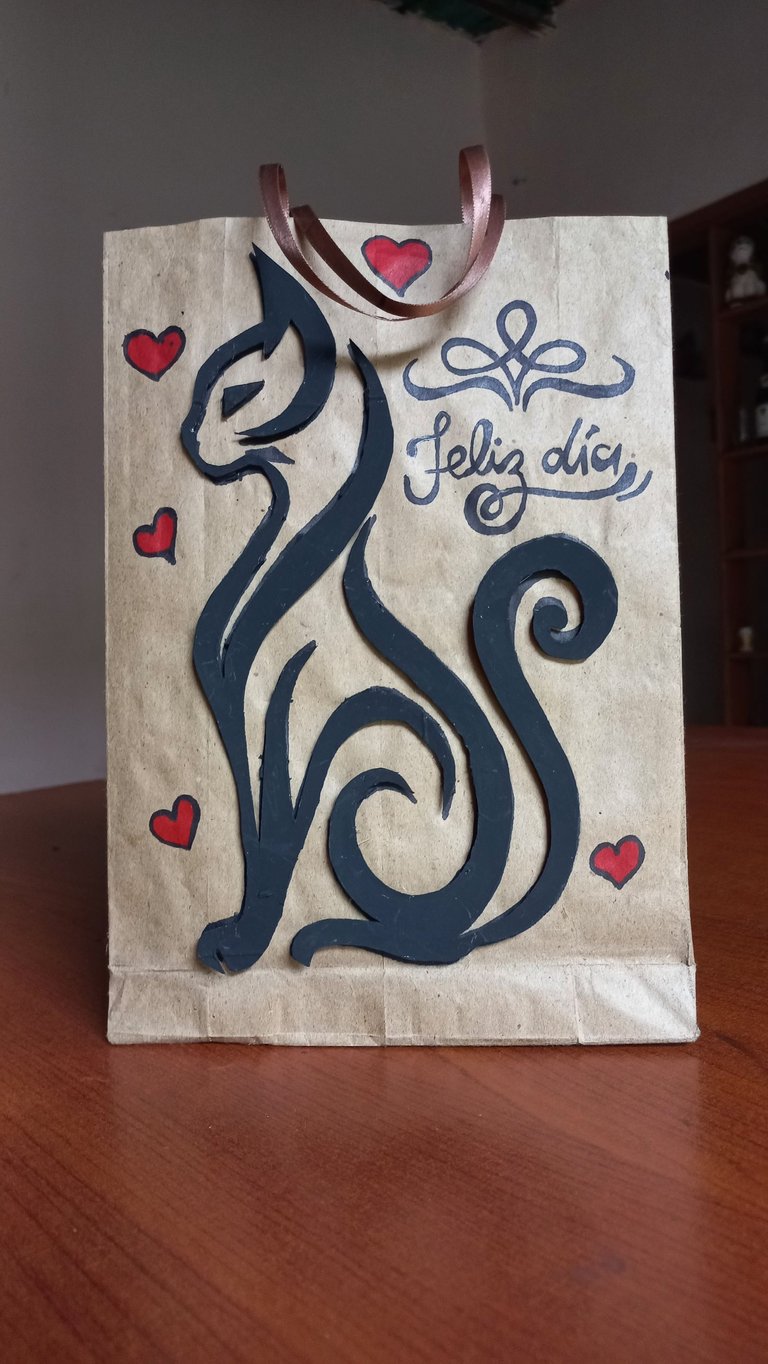
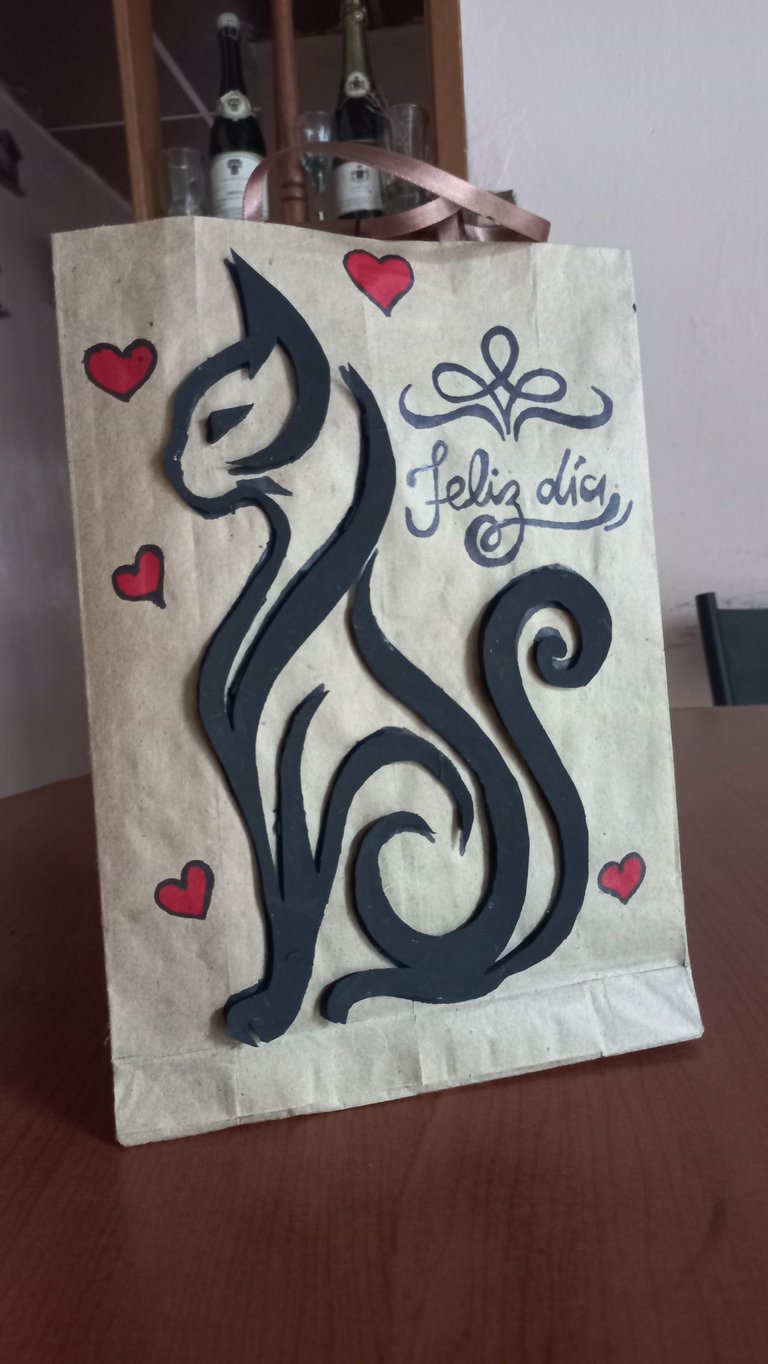
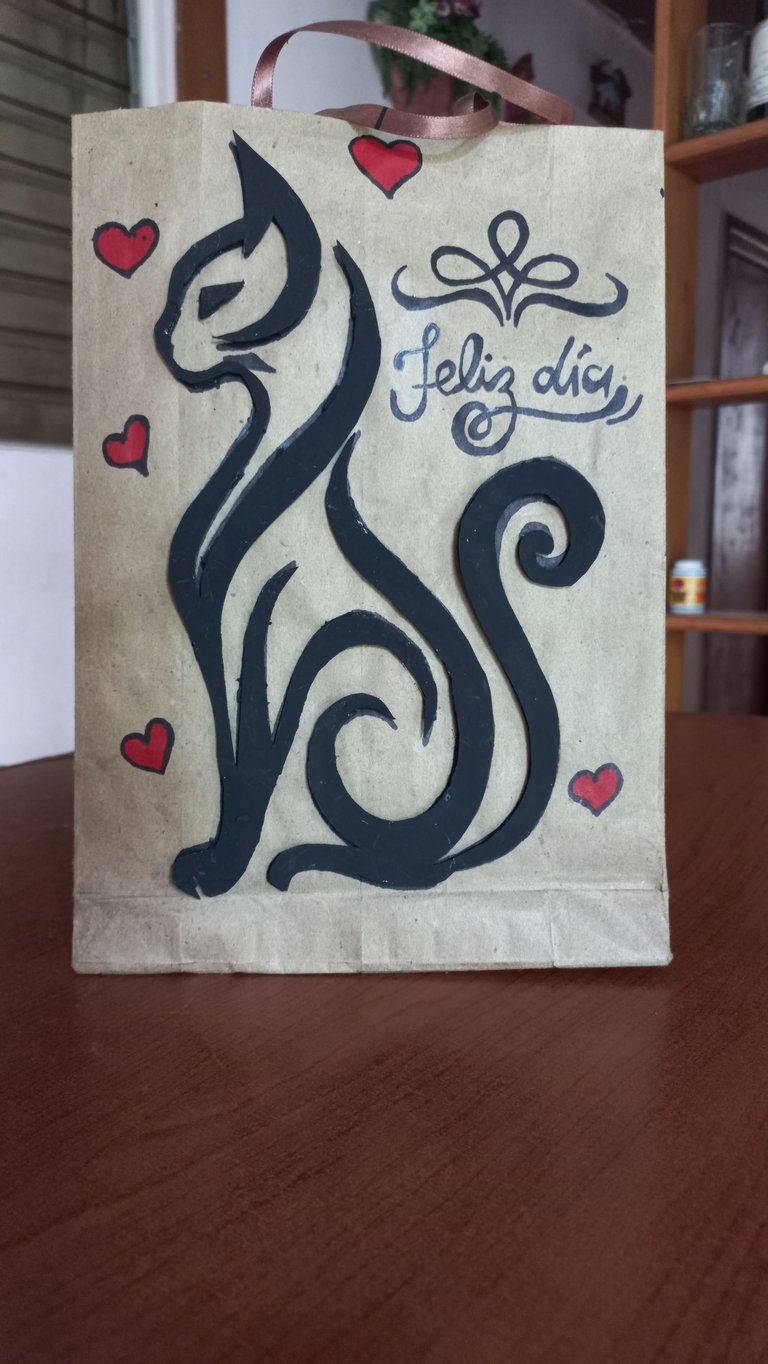
Foto de mi autoría / Photo by me
Traducción: DeepL Translate versión gratuita. / Translation: DeepL Translate Free version.
Traducción: DeepL Translate versión gratuita. / Translation: DeepL Translate Free version.
Posted Using INLEO
hive-176634
spanish
iniciativepapercraft
creativepapercraft
artpaper
papercraftcat
diycat
creative
diy
contest
0
0
0.000
Pero que hermosa bolsa de regalo gatuna, me encantó todo en proceso, muy creativo y original, a mi me gusta mucho este arte del lettering y crear estás lindas bolsitas decoradas, valen la pena, te felicito por este diseño, y por unirte a esta iniciativa, es una comunidad hermosa y hecha con mucho amor, esperemos seguir creciendo, atrayendo más creaciones cómo estás, mucho éxitos y bendiciones, un abrazo, saludos 🤗😍❤️
It is a pleasure to greet you and see your beautiful participation, this gift bag is an art, especially because it shows us the whole step by step, from the creation and design of the bag, to the decorative touch of this cute kitty; we are very excited to see your participation, that you have decided to join and be part of our community, we welcome you with open hugs, and we hope to continue seeing more of your stationery art.
❤️Gracias for participating and bringing us your talent, your team Creative Papercraft❤️
Hola. Me alegra muchísimo que les haya gustado mi trabajo. Es un honor unirme a esta comunidad tan creativa y llena de talento. Me emocionó mucho el recibimiento y ver que apreciaron el paso a paso y los detalles de la bolsita. Solo me queda darles las gracias por recibirme con los brazos abiertos. Espero seguir compartiendo más de mi creaciones con ustedes. Saludos.👋
Congratulations @mily0202! You have completed the following achievement on the Hive blockchain And have been rewarded with New badge(s)
Your next target is to reach 500 replies.
You can view your badges on your board and compare yourself to others in the Ranking
If you no longer want to receive notifications, reply to this comment with the word
STOPHoy 8 de agosto de 2025 día internacional del gato.
Este detalle tan bello es propicio para la ocasión.
Una hermosa creación. Me encantó.
Te felicito 😸😻
Hola. Gracias por comentar. Me alegro que sea de tu agrado. Y si, los gatitos tienen ese encanto único y especial. Saludos.👋
Great use of recycled materials friend. You made a unique gift bag. We applaud your creativity, well done and thanks for sharing.
selected by @ibbtammy
Hola. Me alegra mucho que les haya gustado la idea. Es genial poder darle una segunda vida a las cosas y convertirlas en algo único y especial. Gracias por su apoyo y palabras tan motivadoras. Saludos👋